Last updated on
How to set up GitHub Copilot in VS Code (2026 guide)
GitHub Copilot has a free tier now, and setup takes about five minutes. Here’s the straightforward path from nothing to working completions in VS Code.
Before you start
You need:
- VS Code (any recent version)
- A GitHub account (free accounts qualify for the Copilot free tier)
That’s it. No credit card required for the free plan.
Step 1: Install the Copilot extension
Open VS Code and go to the Extensions panel (Cmd+Shift+X on Mac, Ctrl+Shift+X on Windows/Linux).
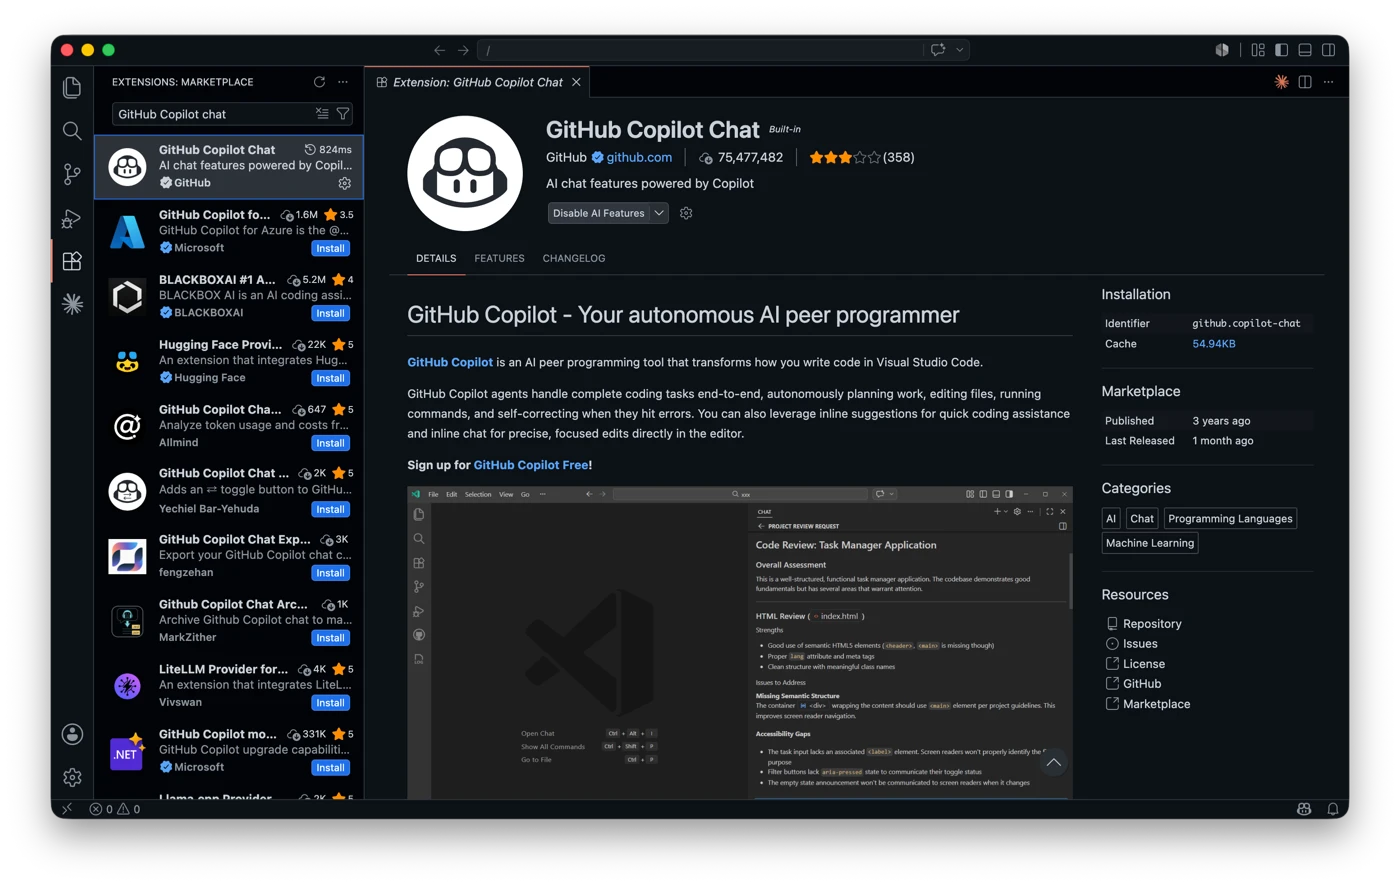
Search for “GitHub Copilot”. Install the extension from GitHub (look for the verified GitHub publisher, shown above). It installs a second extension automatically — GitHub Copilot Chat — which handles the chat interface. Both are needed.
On recent VS Code versions the Copilot extensions ship built-in — you may find Copilot Chat already present and only need to enable AI features and sign in, rather than installing from scratch. Either way, make sure you’re using the official GitHub extensions (verified publisher), not one of the many similarly named third-party ones in the marketplace.
After installation, VS Code will prompt you to sign in to GitHub. Sign in with your GitHub account.
Step 2: Activate the free plan
If you don’t have an existing Copilot subscription, GitHub will offer to set up the free tier after sign-in. The free tier gives you:
- 2,000 code completions per month
- A limited monthly allowance for chat and agent requests
- Access to a selection of models (subject to change) — Claude Haiku 4.5 and GPT-5 mini among them
No credit card needed, and the allowance resets monthly. One thing worth knowing: in June 2026 GitHub switched Copilot to usage-based billing. Code completions and next-edit suggestions stay free and don’t count against anything; chat, agent mode, and code review draw from a monthly pool of “AI Credits” instead. The free tier just comes with a small pool.
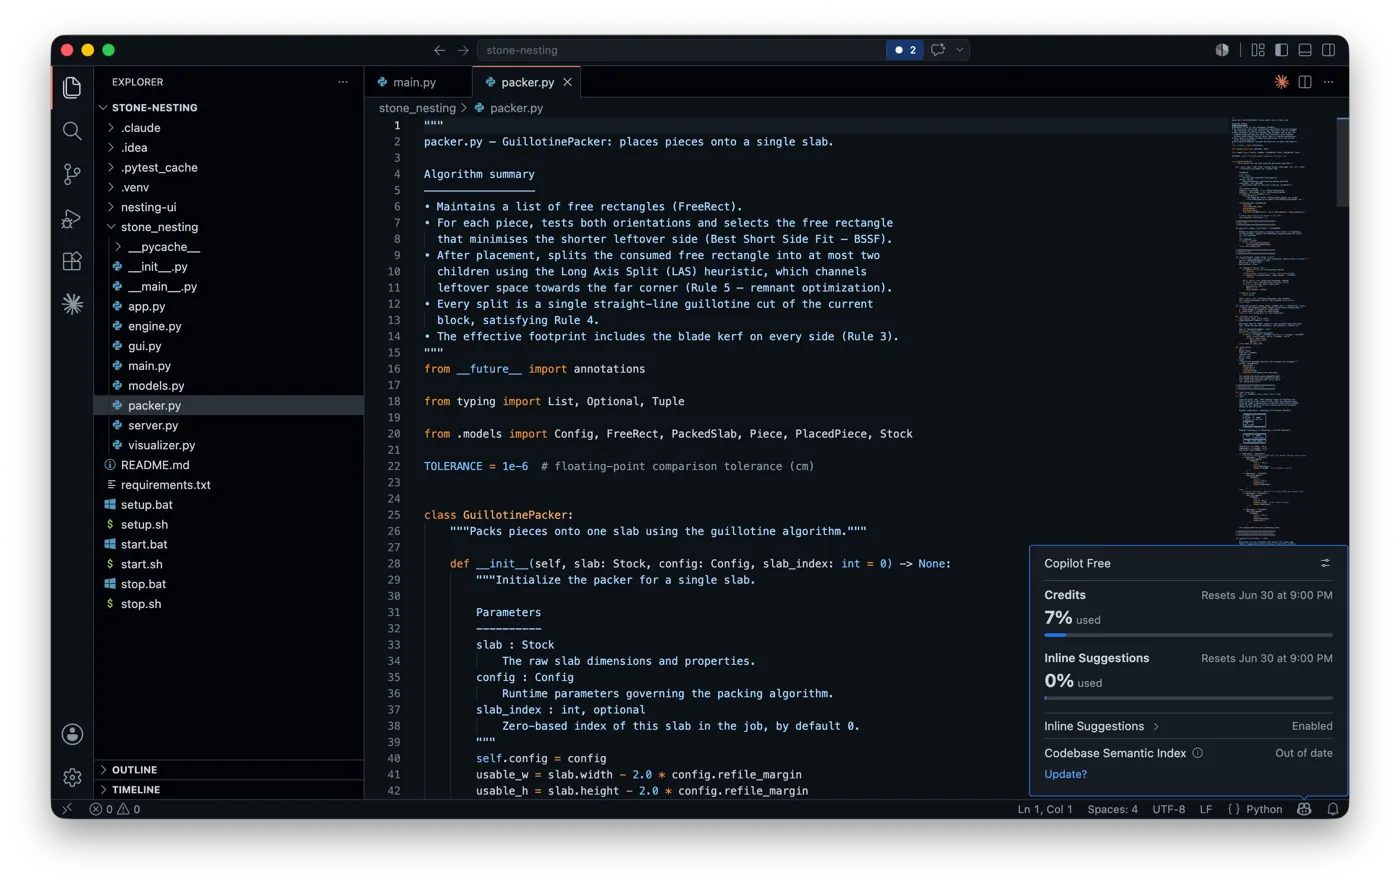
Once you’re signed in, you can check your plan and usage from the Copilot status menu in the bottom-right of VS Code. On the free plan it shows your credit usage and inline-suggestion quota and when they reset — useful now that chat and agent requests draw from that monthly AI Credits pool.
If you already have a Pro subscription, you’ll be signed in automatically after the GitHub auth step.
Step 3: Verify it’s working
Open any code file. Start typing a function. Copilot suggestions appear as gray “ghost text” — press Tab to accept, Escape to dismiss, or keep typing to ignore.
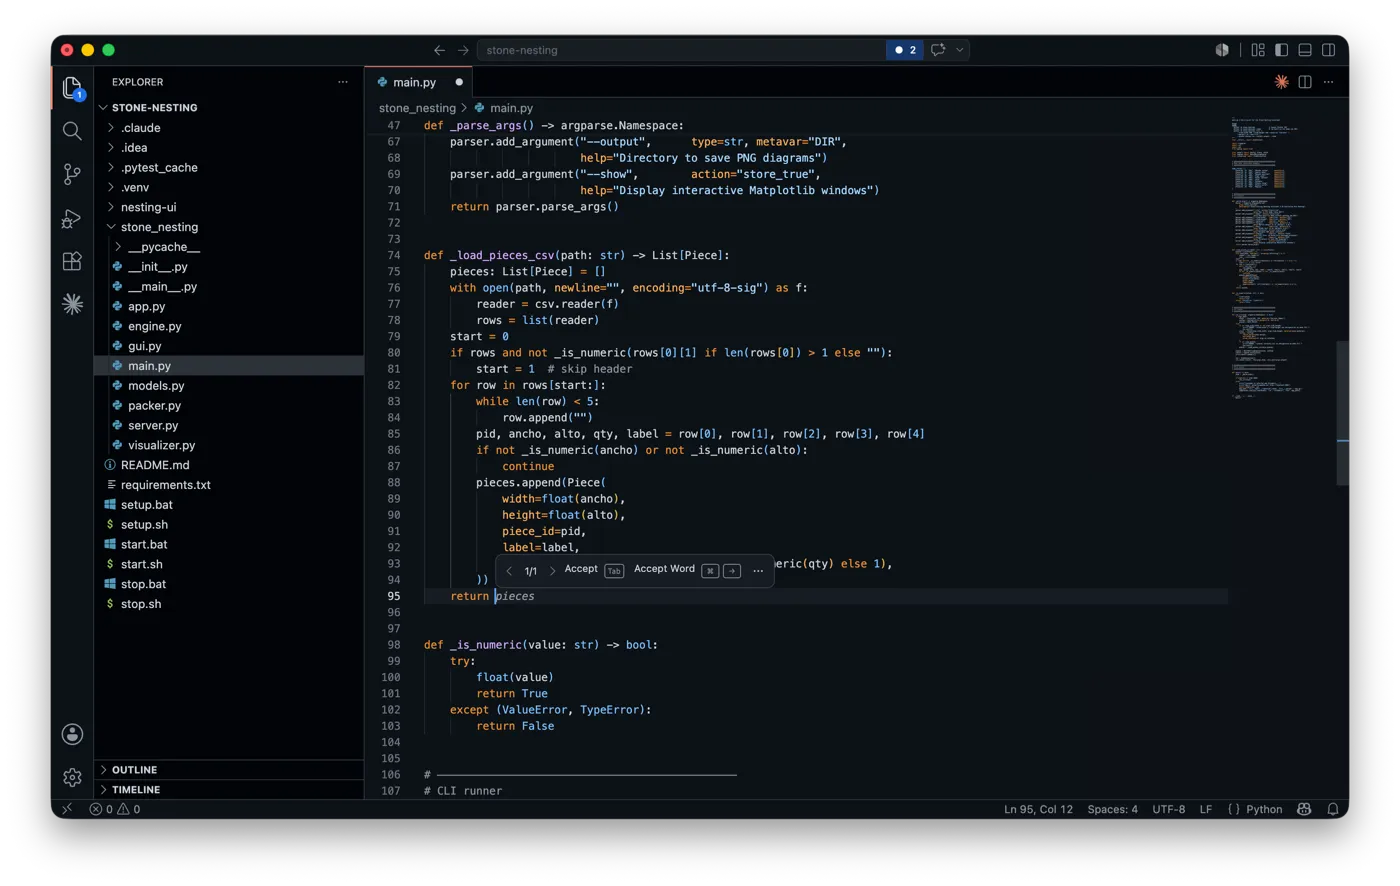
The small toolbar that appears lets you accept the whole suggestion (Tab), accept just the next word, or cycle through alternatives when there’s more than one.
If you don’t see suggestions after a few seconds:
- Check the Copilot status icon in the VS Code status bar (bottom right). A spinning icon means it’s processing; a red icon means there’s an auth or connectivity issue.
- Run
GitHub Copilot: Sign Infrom the Command Palette (Cmd+Shift+P) if the auth didn’t complete.
Step 4: Open Copilot Chat
Press Ctrl+Cmd+I (Mac) or Ctrl+Alt+I (Windows/Linux) to open the Copilot Chat view. (Cmd+Shift+I / Ctrl+Shift+I is the shortcut to switch that view into agent mode.)
Chat is where you ask questions, request refactors, explain code, or give Copilot a task to complete. Unlike completions (which suggest inline as you type), chat lets you describe what you want in plain English and see the result before applying it.
Try asking: @workspace what does this project do? — Copilot will summarize your codebase using the workspace context.
Step 5: Settings worth changing
Open VS Code settings (Cmd+,) and search for “copilot”.
Enable/disable for specific languages:
By default Copilot is active in all languages. If you want to turn it off for markdown or plain text files (where suggestions tend to be unhelpful), add entries to github.copilot.enable:
"github.copilot.enable": {
  "*": true,
  "markdown": false,
  "plaintext": false
}
Inline suggestions delay:
Copilot shows suggestions after a short delay. If you find it distracting while you’re thinking, increase the delay or switch to manual trigger mode (the shortcut to manually trigger a suggestion is Alt+\ on Windows/Linux, Option+\ on Mac).
Opt out of training data collection: If you’re on the free individual plan and don’t want your code used to improve Copilot models, go to github.com → Settings → Copilot → uncheck “Allow GitHub to use my code snippets for product improvements.”
Using agent mode
Agent mode — where Copilot autonomously runs multi-step tasks, edits files, and runs terminal commands — used to be Pro-only, but since the June 2026 billing change it’s available on the free plan too. It’s accessible from the Copilot Chat panel by selecting “Agent” in the mode dropdown.
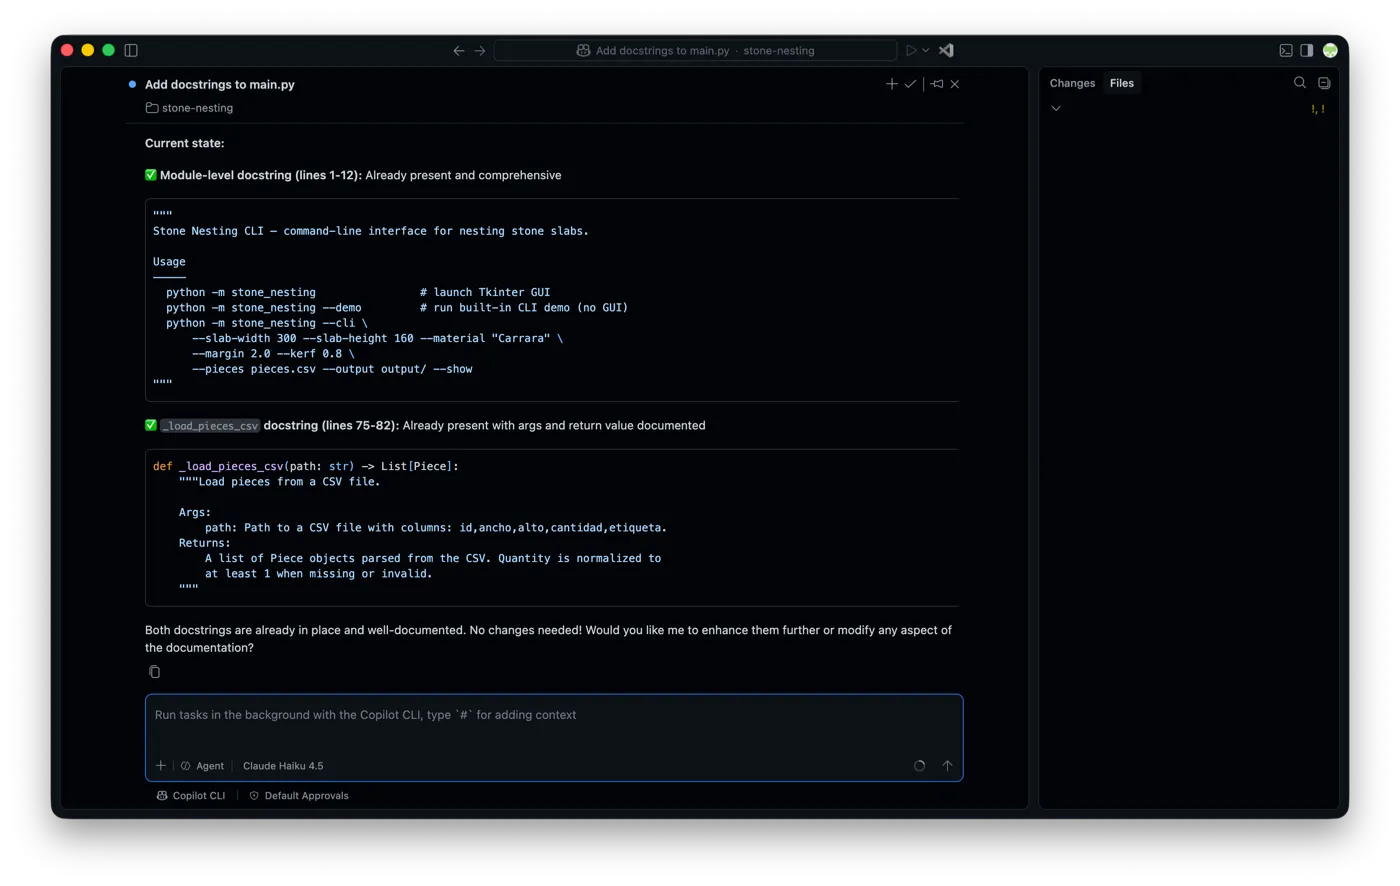
The mode selector sits at the bottom of the chat input, next to the model picker. In Agent mode Copilot plans the task, reads the relevant files, and reports what it changed — or, as here, that the docstrings were already in place and nothing needed changing. You approve actions like running commands before they execute.
The thing to watch on the free tier is the allowance: each agent run consumes AI Credits, and the free pool is small. It’s enough to get a real feel for how agent mode behaves, but if you start leaning on it daily, that’s the point where Copilot Pro — with its much larger monthly allotment — starts to pay off.
Common first-week tips
Use #file to add context. In Copilot Chat, type #file:filename.ts to pull a specific file into the context. Copilot Chat doesn’t automatically read all your files — you add what’s relevant.
Try Explain on unfamiliar code. Select a block of code, right-click, and choose “Copilot: Explain”. Useful when joining a new codebase.
Fix for quick error resolution. When a test fails or the terminal shows an error, paste the error into Chat with a brief description. Copilot’s fix suggestions are often accurate for common errors.
Don’t accept security-sensitive suggestions blindly. Copilot suggests based on pattern-matching, not security analysis. Review any suggestion involving database queries, auth flows, or external API calls before accepting.
See also: GitHub Copilot review · Is GitHub Copilot safe? · AI coding assistants guide · More setup and workflow guides
Frequently asked questions
Do I need to pay to use GitHub Copilot in VS Code?
No. The free plan needs only a recent version of VS Code and a GitHub account — no credit card. It gives you inline completions, Copilot Chat, and even agent mode, which is plenty to evaluate the tool. A paid plan (Copilot Pro, $10/month) mainly buys you a much larger monthly usage allowance, so you reach for it once chat and agent use stop fitting inside the free tier's limited allotment.
How do I install GitHub Copilot in VS Code?
Open the Extensions panel (Cmd+Shift+X / Ctrl+Shift+X), search for 'GitHub Copilot,' and install the extension from the verified GitHub publisher — it pulls in GitHub Copilot Chat automatically. On recent VS Code versions the Copilot extensions ship built-in, so you may just need to enable AI features. Then sign in with your GitHub account when prompted.
Does GitHub Copilot agent mode require a paid plan?
No, not anymore. Since GitHub moved to usage-based billing in June 2026, agent mode — where Copilot autonomously runs multi-step tasks, edits files, and runs terminal commands — is available on the free plan too. You select it from the mode dropdown at the bottom of the Copilot Chat panel. The catch is the allowance: chat and agent requests draw from the free tier's limited monthly usage, so heavy agent use is what pushes you to Copilot Pro.
How do I make sure I'm installing the real Copilot extension?
Check that the publisher is the verified 'GitHub' account. The marketplace has many similarly named third-party extensions; you want the official GitHub Copilot and GitHub Copilot Chat extensions. On recent VS Code builds they may already be present built-in, in which case you just enable them and sign in.